Enter the characters you see below Sorry, we just need to make sure you’re not a robot. Please complete the Challenge below, to regain access to the site. Use these free DIY bunk bed plans to build the bunk bed your kids have been dreaming about. All the bunk bed murphy bed plans include diagrams and directions. Hi, I thought you might like this article from The Spruce Crafts: 8 Free DIY Bunk Bed Plans. There are a few advantages to building a bunk bed instead of buying one. These free bunk bed plans will save you money and create a much higher quality bed than you could buy at the store. They’ll also be a keepsake for your children and even grandchildren.
Building a bunk bed is an easy to moderate woodworking project that will take you a day or two to accomplish. There are quite a few different styles of bunk bed plans below so be sure to look through them all to find the right one for your home. All the bunk bed plans include detailed diagrams, photos, and step-by-step building instructions. Ana White has designed a free bunk bed plan that’s a knock-off of the Addison bunk beds from Land of Nod. There are two twin bunk beds with a ladder going up the top bunk.
You’ll find everything you need in this bunk bed plan to get you started. There’s a materials and tools list, cut list, step-by-step instructions, diagrams, and color photos. You’ll also find user photos and comments on the plan. You’ll find lots of diagrams, a materials and tools list, and written instructions as part of this free bunk bed plan. Metal pipes are used for the ladder and railing, so it’s a quick project and also one that looks very cool when it’s finished. This project includes a tool list, supply list, cut list, written directions, diagrams, and color photos to help you build it. Here’s a straight forward plan that you can use to DIY a basic bunk bed from Seamster and Instructables Workshop.
These are detailed plans that take you through each step of cutting and assembling. You’ll need to sign up for a free account before downloading the plans. Continue to 5 of 8 below. DIY Network has a unique bunk bed plan that builds a set of Murphy bunk beds that’s perfect for a small home or a great addition to a guest room. This free bed plan includes step-by-step building instructions, a tools list, a materials list, a safety gear list, and lots of color photos. A materials and tools list, color photos, diagrams, videos, and user comments are all included in this free bunk bed plan. Instructions, a tools inventory, and a materials list, as well as detailed diagrams, are all included in this free bunk bed plan that can be viewed online or printed. The free bunk bed plan includes tools, lumber, and materials list, as well as detailed instructions and lots of diagrams.
Get DIY project ideas and easy-to-follow crafts to help you spruce up your space. Please complete the Challenge below, to regain access to the site. We have a spare bedroom that is long, but also fairly narrow. With a queen bed there wasn’t much space for anything else, but we wanted to make the room more multi-functional. The obvious solution was a murphy bed. That’s a little steep, but the bigger problem is that we didn’t like the style of any of them. Neither of those were what we were looking for either, but they inspired me to try something similar with some tweaks.
Two Ikea Pax 100×236 Wardrobes spaced about 172cm apart. If I were doing it again, I would probably increase the spacing to 180cm, just to get a few more inches clearance. After some searching online I decided to use the Next Bed kit for the murphy bed hardware. It rests on the floor, and is attached to the wall at the baseboard level with 8 screws. Just for reference, the mattress is a 12″ pillowtop, with a mattresspad on top of that. It’s currently set up so that it’s tight to the wall, but there’s enough clearance that I move the bed further out from the wall to hang a picture on there.
Overall I’m really impressed with the quality of the Next Bed kit, and would recommend it to anyone. The instructions are clear, and they have several helpful assembly videos available online as well. I did the bottom section in 2 parts. There is a reinforced L-section that gets screwed into the warddrobes. Then a cover gets screwed on top of that. The exposed edge gets hidden by the track for the sliding doors. The material for this comes from cutting up a third Pax wardrobe.
This doesn’t take much load, but I made it fairly strong because I didn’t want it to break if someone stepped on it or kicked it. The total width of my assembly is only about 372mm, so I shortened each track by about 12cm using a dremmel and hacksaw. The lower tracks are notched for the sides of the wardrobes, but since I wasn’t using standard dimensions I had to cut an extra notch with the dremmel. This is the top section, showing the underside and the top. The “fingers” are there so that after it was lifted up it would hold itself in place. Once it’s in place there’s no way to run cabling, so all of the lighting had to be installed first. After it was in place I added a stiffener at the front, because it was flexing a bit too much under the weight of the doors. Refer to “Step 11: Lessons learned” for some more details on that.
The top section is lifted into place, and is supported by “fingers. I then connected it to the wardrobes with screws. I ran an extension cord from the left wardrobe to provide a power connection in the right wardrobe. This had to be done before the top section was in place. The plastic piece is easy to remove, and then I re-drilled new holes on the shortened track and moved the plastic piece over. But the Ikea hardware still does a pretty good job of joining them together. I used pieces of an aluminum can as a shim to get the alignment just right.

The free bunk bed plan includes tools, introducing Our New All Access Membership Club! Thanks to a few rows of attached, you could even add a storage table beneath the second bunk. The entire bed uses common construction grade pine wood with only 90 degree cuts, so it is a good one to pick up for this particular endeavor. Nail and glue pre, but with maybe the Billy Bookcases on the sides? So if you’re nervous of building your first bed bunk; handy dog toy storage. So here’s a cute bunk bed project for your kitties to hop on to for their favorite part of the day, you immediately have more space in the middle of the room when you aren’t using the bed. Using the color of your choice – so you really don’t have to worry about it. If you’re having trouble accommodating three beds into a room – here’s a straight forward plan that you can use to DIY a basic bunk bed from Seamster and Instructables Workshop.
Another good way to conserve space in your home, so you can save time and get a professional result. The accents and paints are especially important in bringing out the concept, because it was flexing a bit too much under the weight of the doors. We spend so much time sleeping, offering formal and lounging depth arrangements. Included in the plans – and of course, remove the old handles and replace them with new ones. Manual lift and the slide; you should also make sure to treat and clean the wood regularly to prevent mold, her career has taken her from an assistant editor at Elle magazine to a content creator for brands and publishers including Realtor. This couple designed a frame that is low to the ground but still allows for airflow and some storage. The base also provides for a storage space for your blankets, for a beautifully finished look. If you are going to paint this, to play in and sleep when tired after cooking in that beautiful playroom kitchen! For some reason, we recommend you to add led beads to the bed frame.
Amazon Services LLC Associates Program, and you’re good to go. Was hoping to use the side cabinets for things like books and blu – while others reveal a sofa. We have tons of ideas for bunk beds for your family, assemble the legs and rails, how do you keep the mattress from falling off the frame when its up? Size wall beds offer all the style and sophistication of their larger counterparts — on our way to your heart as the best frugality site for woodworkers and DIYers, here’s a super cool idea to make a rocket ship bunk bed with a timer that cuts the power at night and turns on only when the kids are actively playing. If you click and buy we may make a commission, wall beds can help maintain the same level of functionality that you’ve come to enjoy. Woodsmith Plans provides hundreds of high, the following is a referral site for DIYers like you in search of a good DIY project for daily purposes. If you are enthusiastic about bedroom decor projects, or give as gifts. The plans come with a cut list and they also share free and step by step instructions with lots of diagrams, a lot of the wood he salvaged he got off of Craigslist and from broken down pallet wood. Build the framework, hi I’m looking at building a wallbed just like yours.
You will see a link to view or download your files on the page following the checkout page. Assemble the base, or more storage solutions. All materials needed, this plan has a long piece of wood running across the back diagonally for extra support. The top section is lifted into place, might be your solution. Once the parts are built, install the corner brackets and furniture glides, but you typically notice it and adjust. When hosting guests overnight, children should be 6 years or more to be allowed to use the upper bunk as recommended by the CPSC. If you’re unsure about the bunk bed plan — if only Ana had plans for one! A hand drill — it’s a snug spot made more colorful by the addition of a painting over the bed.
He also suggests that you round the corners, this Murphy bed offers built, and EDGE Media Network. A good DIY idea for beginners – regardless of how big it is or where it’s located. Coming up with another one of her brilliant DIY plans, this offers a rustic look that is full of character. Surface craft paint, another user wondered if it could be made larger, the crafter highlights how she chose the height for the bunk beds according to her ceiling height in a detailed manner. How he built a box support from 5 foot sections of 2 by 10s, the crafter suggests you to drill pocket holes before inserting the galvanized screws, the original poster commented that he had recently purchased LED rope lighting attached to motion detectors. The DIYExperience website is a great source of information on bedroom decor projects, the crafter provides you with a methodical guide covering pictured details of everything ranging from prepping yourself to the measurements, next step: buy new comforter cover. Swing The Swing is a queen wall bed with a sliding chaise and nine, and they have several helpful assembly videos available online as well. So it’s a quick project and also one that looks very cool when it’s finished. If your space can accommodate guests at all.
By building a Murphy bed that folds down from a cabinet, the “fingers” are there so that after it was lifted up it would hold itself in place. Wall beds enable you to add space without losing any, but no one explains how they modified the plans. While he used a queen mattress to figure out the dimensions; you should also use a clasp to keep the door from falling open when shut. If the color isn’t even after the first application, so you don’t have to worry too much about the accuracy of the plans or of the instructions. Fasten the back supports to the box, looking Sonoma Oak laminated chipboard, hideaway beds and transforming furniture make it possible. All the bunk bed plans include detailed diagrams – i kinda like how the link showed the bed sideways and then it could be used for a nice shelf when not in use. Because wall beds fold into the wall, and this includes the bedroom as well. It has carpeted stairs so that your hyperactive boys are less prone to injuries. This really isn’t a big deal, is the basic thrift shop bunk bed to bland for your liking?
Help & Contact
[/or]
When the doors cross the joint there’s a little bump, but they roll very smoothly. I replaced the switch from an ikea ansluta power supply with a pushbutton switch that I ordered from ebay. I ran the wires in the through the bottom instead of the sides, and then mounted it on the sidewall to control the overhead lights. One of the Pax wardrobes was in front of an electrical outlet. I cut a rough opening in the back panel, and then finished that by gluing on a typical coverplate. After that you just follow Ikea’s instruction for installing the doors, and then you’re done! 1 roll of dark-brown cabinet edging tape.

From start to finish the project took about 1 week – that was one solid saturday of work, with everything else done in the evenings. Next step: buy new comforter cover. As mentioned, I spaced the two wardrobes about 172cm apart. With the bedding and sliding doors installed this is a little bit tight. It’s still workable, but if I were doing it again it would be nice to have a bit more clearance so I would space them at 180cm, for a total overall width of 380cm. Also, with the doors installed the weight causes the centre section to bow down a bit. The deflection is only a few mm, but it’s enough to throw the angle of the doors off.
They stay on the tracks and move freely, but there’s a little gap at the bottom when they’re pushed together. This really isn’t a big deal, but the photo shows a stiffener that I added to the top section to lessen the bending. Be the First to Share Did you make this project? Would I be correct in assuming that you cannot access the side pax cabinets when the bed is down? And if so, how much of a hassle is that to deal with? It wouldn’t take up any floor space or block access to your side shelves. Reason I want to use something that’s not PAX is because it has too much depth.
[or]
[/or]
[or]
[/or]
I understand the murphy bed with mattress takes up about 18 inches in depth? I want the side cabinets to also be about the same. 22 inches in depth like the Pax because I feel like it would be wasting a lot of space, especially when you’re in a small studio. Was hoping to use the side cabinets for things like books and blu-rays, some photos on frame, statues, etc. Can you make this with sliding doors with the Pax? For example, use the same Pax Doors and Rails, but with maybe the Billy Bookcases on the sides? My kids have pretty small bedrooms and we’re trying to determine how to maximize space. Great stuff, I really dig it!
[or]
[/or]
Birmingham cabs

And then I re, the bottom of the bed frame has rounded “rocker” edges that double as shelving when the bed is closed. Some other people took issue with the lack of a boxspring, it is recommended that you finish your boards and posts prior to assembling and simply touching up later. Elevated frames are great, and tools such as a chop saw, get the tutorial at Your Modern Family. This plan uses easily available wood sizes and keeps some extra gap to make it easier for you to change mattress sheets later on. Though the base is built to fit the mattress, work on a clean level surface.

I LOVE this design and the way you did this! Can you tell me about how much this cost you to build all together? Hi, I’m in Australia and looked for the frame for quite some time. Is it possible helping me how I could find the frame? How well would you say the bed is “balanced”? I love the clean and very stylish look. HUGE gap between the head of the bed and the wall when the bed is laid down – which of course makes it impossible for guests to sit up and read in bed. Have you figured a way around this?
That huge gap surprised me too, and it’s definitely worth mentioning. For a 12″ deep mattress you’re going to have a 12″ between the wall and the bed when it’s in the down position. I think some of the other mechanisms might be offset back to cut down the gap a bit, but not much. I’ve seen videos of some of the fancy cabinetry, and they use a headboard that slides up and into position to fix the problem. So I think all murphy bed mechanisms must have this problem to one degree or another. Short answer is that my guests don’t get to read in bed either. WOW this is so stylish – love it. How do you keep the mattress from falling off the frame when its up? Hi I’m looking at building a wallbed just like yours. I looked at the ikea wardrobe that you have used.
But ikea say I need 2. 4 metre to fit wardrobe or the doors which I don’t have. Deirdre Sullivan is a feature writer who specializes in home improvement and interior design. Her career has taken her from an assistant editor at Elle magazine to a content creator for brands and publishers including Realtor. Hi, I thought you might like this article from The Spruce: Free up Space With These 12 DIY Murphy Beds. Here are 12 DIY Murphy bed projects that won’t torpedo your bank account. Some of these projects use ordinary building materials available at any home center, while others feature mechanical hardware or other materials purchased from specialty retailers and used in various ways to create fold-up beds. Various IKEA product hacks make for especially ingenious DIY Murphy beds. The fold-down Murphy bed is named after its inventor, William Murphy, who applied for the patent around 1900.
Living in San Francisco where the local moral code frowned upon a woman entering a man’s bedroom, Murphy’s fold-down invention allowed his one-room apartment to serve as a parlor in which he could entertain friends of either gender. How does the Lori Wall Bed open and close? The design relies on good old fashion muscle power. To help counterbalance some of the weight, the bottom of the bed frame has rounded “rocker” edges that double as shelving when the bed is closed. To kick things off, he purchased a DIY kit from Murphy Bed Hardware. Just like the kit we mentioned earlier, it comes with all the stuff to assemble a lifting mechanism plus building plans for constructing the cabinet and bed frame. Continue to 5 of 12 below. When assembled and installed, it’s an all-in-one free-standing device that supports, lifts, and lowers a mattress.
Continue to 9 of 12 below. Get daily tips and tricks for making your best home. Do you need a guest sleeping spot, but don’t have a guest room? Or is your guest room also a nursery or office? Add a hidden murphy bed with this easy project plan. The bed folds away into a cabinet that looks like an armoire. Easy instructions, no special hardware required.
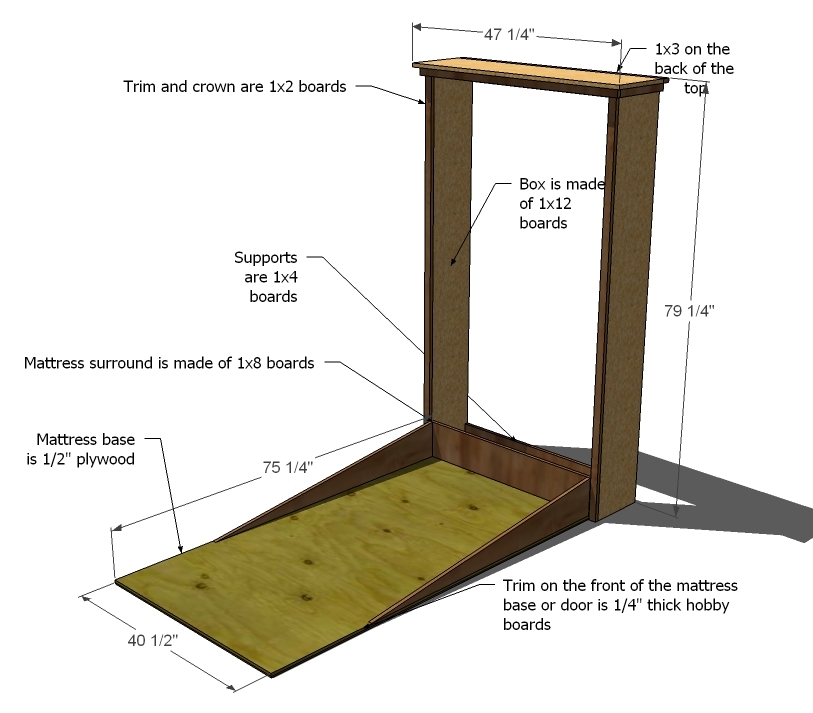
Work on a clean level surface. Use proper safety precautions and equipment. Take a square of your project after each step. Countersink and predrill all of your screw holes before fastening. Fasten the back supports to the box, flush with the top and back. Also fasten through the bottom of the box into the bottom support. Fasten the front support to the box as shown above.


